Get our exclusive report. Download the iSport360 Club Switching Report Here – For Club Admins, Rec Leaders and Coaches.
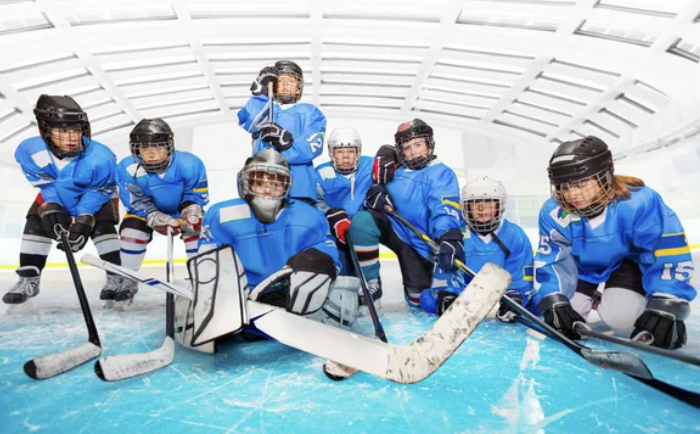
10 Hockey Drills for Beginners
If you’re a novice hockey player, the learning curve can seem pretty steep: Before you can become a contributing member of a team, you must develop some level of proficiency in each of the sport’s four basic skills—skating, stick- handling, passing, and shooting. Therefore, hockey drills for youth and adult beginners alike focus on these four basic skills. A building-block approach, in which each drill builds on the skills of the one before, helps a player improve quickly; drills that work on more than a single skill at once accelerate improvement as well. Here are 10 basic hockey drills for beginners that will get you started toward a great time on the ice.
SKATING DRILLS FOR BEGINNERS
- Superman Drill: This drill is both simple and fun. As a novice learning how to skate, you’re inevitably going to fall down, so learning how to get back up quickly and get back into the action is important. Starting at the goal line, skate to the closest face-off circle and then throw yourself to the ice in a classic Superman pose. Get up as quickly as possible, by first getting to your knees and then standing up. Skate to the next mark on the ice (the blue line or red line), and do it again. Repeat until you get to the other end of the ice. Once you’re getting back to your feet quickly, try this drill with a hockey stick in your hands, as well.
- Obstacle Course: This drill improves your agility on your skates, and it works as well for roller and inline hockey as it does for players on the ice. During a game, you never know where the puck will go next, so you’ve got to be prepared to change direction on a dime. To practice this, make an obstacle course using cones, pucks, gloves, or anything else you’ve got handy. The course should require you to turn in both directions and reverse direction. Start by going through the course slowly, and then focus on increasing your speed and keeping your head up.
- Forward-to-Backward Transitions:Ice or inline, skating backward is an important skill, and a player should be able to make smooth transitions from forward to backward skating, and vice versa. Starting at the goal line, skate to the blue line, and then switch to skating backward. At the next blue line, switch back and sprint to the goal line. Again, start slowly and work to build up speed. When you feel you’ve mastered the transitions, try this drill making direction changes at the face-off circles, blue lines, and red line—five transitions over the length of the ice, ending by skating backward over the opposite goal line.
STICK-HANDLING DRILLS FOR BEGINNERS
- Basic Stick-handling: One great puck handling drill for beginners doesn’t ever require ice—you can do this just as easily at home with a puck or a ball. And that’s great news, because maintaining control of the puck with your stick needs to become second nature, which requires lots of repetitive practice. For this drill, stand with your feet shoulder-width apart, and hold your stick with your hands in front of you. Stick-handle the puck back and forth directly in front of you for a ten count. Then move the puck all the way to the right, so the puck is directly beside you, and stick-handle for another ten count. Return to the middle for a ten count, and then move the puck all the way to the left for a ten count.
Make sure you keep the stick blade flat against the ice or the floor and try to keep the puck in the middle of the stick blade, rather than on the heel or the toe. Your top hand—the one higher up on the stick—should control the blade, while the bottom hand simply guides the stick. Start slowly, and increase your speed as you can while remaining in complete control.
Finally, practice this drill with your head up, not looking at the puck at all.
- Circle Skate with the Puck: Skating while stick-handling adds another layer of complexity. Pick one of the face-off circles and skate around it while maintaining control of the puck. Then go in the other direction. If you have enough room, use two face-off circles and do figure-eights. Again, work on increasing your speed—while staying in control—and on keeping your head up.
- Obstacle Course: This is the same as #2 above, but now you need to work on making it through the course while maintaining control of the puck.
PASSING DRILLS FOR BEGINNERS
- Basic Passing: The keys to making a good pass are keeping your stick blade on the ice and “cupping” the puck—that is, closing the blade over the puck. If you fail to cup the puck, the puck may fly off the ice. When you’re receiving a pass, you must also “cushion” the puck, absorbing some of the energy of the pass, so the puck doesn’t just bounce off your stick blade. The best way to learn these techniques is to make thousands of passes.
The simplest drill is to line up 20 feet from another player and then pass the puck back and forth, concentrating on stick-blade control and technique. Make passes to both sides. Continue the drill, adding ten more feet to the distance between you, and increase the velocity of the passes. If you don’t have another player to work with, there are several products available that will send your passes back to you, allowing you to work on your technique alone.
- Skating and Passing: Next, take the passing skills you’ve developed and add skating to simulate game conditions. You and your partner start at the goal line, 20 feet apart. As you skate down the ice, pass the puck back and forth. When you get to the other end of the ice, switch positions; so, if you were to the right of your partner, switch to his or her left. If you have no partner, use the boards to make passes to yourself. Skate around the perimeter of the rink, passing the puck off the boards and receiving the rebound. Change directions, so you are making and receiving passes in both directions.
SHOOTING DRILLS FOR BEGINNERS
- Shooting for Accuracy:If you want to score goals, you’ll need to practice shooting. To work on basic accuracy, bring a bunch of pucks onto the ice and position yourself in front of the goal, even with the face-off spots. Divide the goal mouth into five “holes”—left high, left low, five-hole, right high, and right low—and practice hitting each spot. When you feel comfortable that you can put the puck where you want it from in front of the net, move your pucks to the face-off circle to the right of the goal and shoot from there. Finally, repeat the process from the face-off circle to the left of the goal.
- Skating and Shooting: You’ll also need to learn to shoot while on the move. Put a bunch of pucks in the corner, and pick one up as you skate by. Skate up the wall, around the face-off circle, and back toward the net. Pick where you want the shot to go and shoot without stopping. Swing back through the corner, pick up another puck, and repeat. Perform this drill from both sides of the goal. To add a level of complexity, have someone pass the puck to you as you come around the face-off circle. Receive the pass and, without stick-handling, take a shot. Cycle back around the circle and prepare to receive another pass. Practice this from both sides of the goal.
Practicing these drills will give you a strong foundation from which to build on your journey toward becoming a skilled hockey player. The more time you can spend working on these four basic skills, the faster you’ll improve.
For more information about hockey from iSport360, click here. For the original article, please click here.
Learn more or request a demo of our youth sports software that is helping teams improve communication, organization and player development.
April 1, 2022
Share This Story, Choose Your Platform!
Related Posts

